


Your $70,000 prosthetic leg is one bad morning away from becoming a very expensive, rusted-out paperweight. Learning how to waterproof a prosthetic leg for the shower isn't about being fancy; it's about survival and not lighting your bank account on fire. We know the drill. The fear of slipping on wet tile or the pure annoyance of removing your limb for the tenth time today is a damn exhausting reality. It's even worse when you realize a dedicated WaterGait shower leg starts at $2,050; a price most insurance companies won't touch in May 2026 because they think showering is a luxury.
We're here to fix that. You're about to learn how to protect your hardware and your dignity using real-world strategies that actually work. We'll break down everything from the $73.99 DRYPRO vacuum covers to the DIY tactics that keep you upright without breaking the bank. It's time to stop treating your basic hygiene like a high-stakes gamble. This guide delivers the tactical intel you need to stay dry, keep your skin healthy, and protect that high-tech investment from water damage.
Key Takeaways
- Stop the rot before it starts by understanding why standard carbon steel and aluminum components are a damn disaster when they hit the water.
- Master how to waterproof a prosthetic leg for the shower with vacuum-seal sleeves or dedicated stainless steel hardware that won't rust.
- Discover tactical "MacGyver" strategies using heavy-duty bags and duct tape for those times you need a quick, budget-friendly fix.
- Ditch the bathroom wipeouts with a no-nonsense safety checklist that covers everything from non-slip mats to the sit-or-stand debate.
- Keep your sanity and your style intact with real-world advice on managing the daily grind and finding a community that gets it.
Why Your Everyday Prosthetic Leg and Water Are a Damn Disaster
Your leg is a masterpiece of engineering, but it's not a damn submarine. Most people don't realize that a modern Prosthesis is built for land, not the deep end of a bathtub. If you've been wondering how to waterproof a prosthetic leg for the shower, it’s because you already know the stakes are high. We're talking about components made from carbon steel and aluminum that start to oxidize the second they hit high humidity. It’s a fast track to turning a $20,000 investment into a heavy, useless paperweight. If you've got an electronic knee or high-tech microprocessor components, they aren't just sensitive; they're effectively allergic to moisture. One bad shower can fry the circuits and leave you stranded on the bathroom floor.
The Mechanics of Rust and Corrosion
Rust doesn't just look ugly; it kills functionality. The pivot points in your knees and ankles are precision-tuned machines. When water gets in, those smooth movements become jerky and unpredictable. It's not just the water either. Soap residue and salt from your skin accelerate the degradation of carbon fiber and metal alloys. Don't think you can just "dry it off" with a towel and call it a day. Moisture gets trapped in the internal bolts and springs where air can't reach, eating your leg from the inside out while you’re busy getting dressed. It’s a slow, expensive death for your gear.
The Hidden Danger: Socket Hygiene
Water trapped inside your socket is a recipe for a medical disaster. It creates a warm, dark petri dish environment that’s perfect for breeding bacteria. For an amputee, this isn't just gross; it's a direct threat to your mobility. You're looking at a high risk for several nasty side effects. Fungal infections thrive in the damp gap between your liner and your skin. Skin maceration, where your tissue stays wet too long and starts to tear, can happen in minutes. Bacterial colonies cause odors that no amount of spray can fix and lead to sores that keep you out of your leg for weeks.
When you're trying to figure out how to waterproof a prosthetic leg for the shower, you're fighting for your skin health as much as your hardware. Liners and water are a toxic mix. It’s a damn hassle you don't need, and the recovery time for a stump infection is a price nobody wants to pay. Protecting the socket is the difference between a productive day and a week spent on the couch.
Professional Waterproofing: Covers, Sleeves, and Dedicated Shower Legs
You shouldn't treat your $70,000 limb like a damn rubber duck. If you’re done with the anxiety of a wet socket, it's time to look at professional-grade gear. Figuring out how to waterproof a prosthetic leg for the shower usually leads you down two paths: slapping on a high-tech sleeve or buying a secondary leg built for the splash zone. There is a massive difference between "water-resistant" and "waterproof." Water-resistant components might handle a light mist, but they’ll choke and die if you submerge them. Waterproof gear is built to take the hit and keep moving. It’s the difference between a minor inconvenience and a total equipment failure.
Vacuum-Seal Covers: How They Work
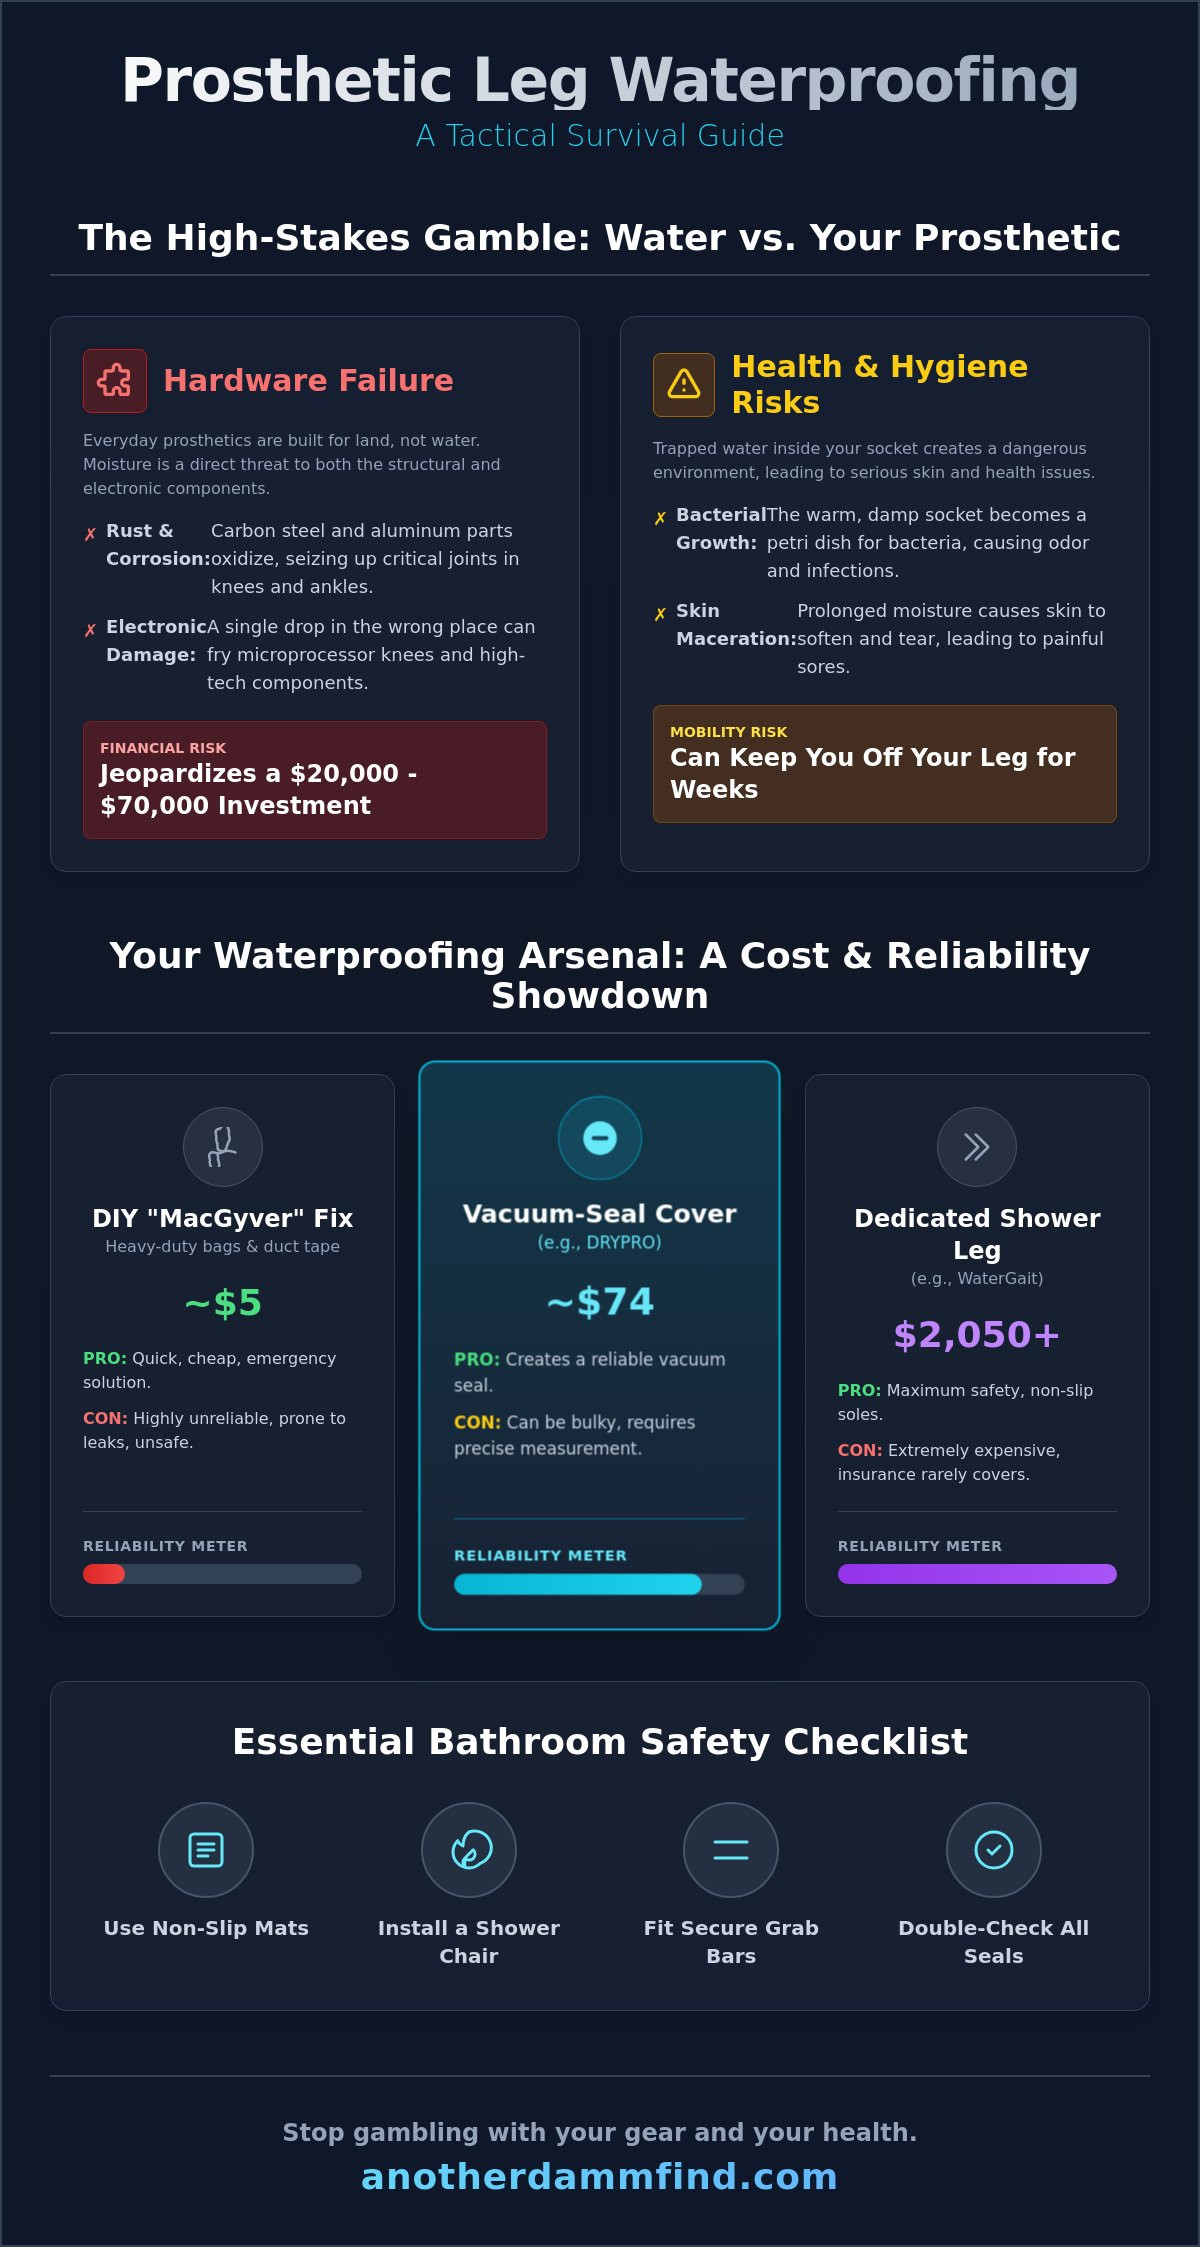
The most popular pro-level fix is the vacuum-seal cover, like the DRYPRO, which retails for approximately $73.99 to $74.99 in May 2026. These aren't just thick rubber socks. They use a small bulb pump to suck out every bit of air, creating a literal vacuum seal around your limb. It’s physics in action. If there’s no air, there’s no room for water. To get the fit right, you need to measure the circumference of your leg about two inches above your socket or liner. If it’s too loose, the vacuum fails. If it’s too tight, you’re cutting off circulation. These sleeves are heavy-duty and reliable, though they can feel a bit bulky and restrictive when you’re just trying to wash your hair.
The Dedicated Shower Leg: A Luxury or Necessity?
If you have the budget, a dedicated shower leg like the WaterGait is the ultimate goal. These are stripped-down, secondary prosthetics made from plastic and stainless steel hardware that won't rust. A self-pay WaterGait leg starts at $2,050, which is a steep jump from a $74 cover. The benefit is pure safety. They come with non-slip rubber soles designed specifically for wet tile. The hurdle? Insurance. Medicare typically considers standard covers (L-Codes L5704 through L5707) sufficient for "normal daily usage." While Medicare Part B usually covers 80% of approved prosthetic costs after your deductible, they often reject dedicated shower legs as not "medically necessary." You’ll need a damn good justification from your prosthetist, usually centered on fall prevention, to get them to pay up.
Whether you go with a vacuum sleeve or a full secondary limb, taking control of your mobility is a vibe. While you're leveling up your gear, you might as well look the part with some amputee awareness apparel that actually has some attitude. Don't settle for the sterile medical look when you can own your aesthetic.
The DIY "MacGyver" Strategy: Waterproofing on a Budget
Let’s be real. Not everyone has $2,050 sitting around for a dedicated shower leg or even $75 for a vacuum sleeve when they’re in a bind. Sometimes you’re just trying to get clean without destroying your $70,000 microprocessor knee. Knowing how to waterproof a prosthetic leg for the shower using what’s in your kitchen is a survival skill. It’s gritty. It’s not pretty. But it works when the alternative is a rusted-out pylon and a week of repairs. DIY methods are the tactical field repairs of the amputee world. They get the job done, but they require a level of focus that pro gear doesn't.
The Trash Bag and Duct Tape Protocol
The heavy-duty trash bag method is a classic for a reason. Don't use those flimsy 13-gallon kitchen bags that tear if you look at them wrong. You need 3-mil contractor bags. The protocol is simple. Double-bag the limb to ensure zero leakage. Pull the first bag up past the socket and secure it with a few rounds of duct tape. Then, pull the second bag over that and tape it again, slightly higher on the thigh. Pro tip: fold the top inch of your liner down over the first layer of tape to create a secondary gasket. Always perform a "leak test" by splashing a little water on the seal before you fully commit to the spray. If you see a bead of water move, stop and re-tape. It’s a damn sight better than a soaked socket.
Emergency Waterproofing for Travelers
Hotel rooms are the ultimate test of your MacGyver skills. You’re away from your gear and stuck with whatever is in the closet. Use the plastic laundry bag provided in the room. If it’s too short, use two and overlap them. Secure the top with the elastic from a shower cap or even the plastic ties from the dry cleaning bag. It’s moments like these where amputee humor becomes your best defense against the absurdity of the situation. Laughing at the fact that you’re standing in a Marriott shower with a laundry bag taped to your leg beats the hell out of being frustrated. Just remember that wet plastic on a tile floor is a death trap. DIY solutions lack the non-slip tread of a real shower leg, so keep one hand on the grab bar at all times. Safety isn't a suggestion; it's the only way you’re getting out of that bathroom in one piece.
Step-by-Step: How to Shower Without Wiping Out
Knowing how to waterproof a prosthetic leg for the shower is only half the battle. The other half is not cracking your skull open on a wet tub floor. Standard prosthetic feet have zero grip on porcelain. They don't have toes to curl or skin to create friction. You are essentially standing on a wet piece of plastic. Prep is everything. If you skip the environment prep, even the most expensive vacuum seal won't save you from a nasty fall. Safety in the bathroom is about tactical planning, not just gear.
Setting the Stage for Safety
Non-slip mats are non-negotiable. Don't trust the built-in "texture" of a standard tub. Get a high-quality suction mat that covers the entire floor area. If you're traveling or renting, temporary suction-cup grab bars can be a literal lifesaver, though they aren't as reliable as bolted-in hardware. A handheld showerhead is your best friend here. It lets you direct the water exactly where you need it. This prevents you from soaking the top seal of your cover unnecessarily and keeps the water off your face while you’re trying to balance.
Let’s settle the "Sit or Stand" debate once and for all. Using a shower bench isn't about being "old" or "weak." It's about tactical stability. Even with the best waterproofing, your balance is compromised the second that floor gets slick. Sitting down allows you to focus on hygiene rather than survival. It turns a high-stress gamble into a damn relaxing routine. If you insist on standing, keep one hand on a grab bar at all times. No exceptions.
The Post-Shower Drying Protocol
Most people mess up the exit strategy. If you pull off a wet cover while your leg is still in it, gravity wins. Water will drip straight down into your socket. That’s how you end up with the bacterial petri dish situation we discussed in section one. Use a dedicated towel to bone-dry the outside of the cover or bag before you even touch the tape or vacuum seal. Make sure there is zero standing water on the rubber before you break the seal.
Once the leg is off, inspect your residual limb immediately. Look for red spots or "pruned" skin. This maceration is a clear signal that your waterproofing failed and moisture got in. Hang your cover in a well-ventilated area to dry completely. Don't just toss it in a dark corner to grow mold. If you’re going to put in the work to stay dry, finish the job with proper storage. While you're staying safe and dry, check out our amputee awareness t-shirts to keep that same bold energy once you're back in your street clothes.
Beyond the Shower: Keeping Your Sanity and Your Style
The mental load of being an amputee is heavy. Showering shouldn't feel like a high-stakes tactical operation every single morning. But here we are. It’s perfectly fine to think this whole process is a damn nightmare. Managing the daily frustration is part of the job. You aren't just protecting a $70,000 limb; you're protecting your peace of mind. Finding a community of people who have been exactly where you are makes the grind feel less like a solo mission. There is a specific, self-assured subculture of people who get the struggle and the humor required to survive it.
Identity and Limb Loss
Clinical gear is boring. It’s sterile. It’s designed by people who prioritize function over the "vibe." Don’t let your hardware define your soul. Reclaiming your confidence starts with how you present yourself to the world. Whether it’s through dark humor or high-impact style, you have the power to shift the narrative. This is exactly why we created the Another DAMM Find story. We’re about veterans, amputees, and raw art that doesn't apologize for existing. Your identity isn't tied to your mobility; it’s tied to your attitude. Check out our graphic tee guide to see how to wear your personality on your sleeve, literally. You’ve already mastered the hardware; now it’s time to master the aesthetic.
Final Gear Check and Next Steps
Before you go full DIY or drop two grand on a shower leg, talk to your prosthetist. They’ve seen every failure point imaginable. They can tell you if your specific suspension system will hold up to a vacuum sleeve or if you’re a candidate for a dedicated limb. If you’ve been wondering how to waterproof a prosthetic leg for the shower but find the DIY bags aren't cutting it anymore, it might be time to stop the "MacGyver" routine. If you can't get insurance to cover the $2,050 for a WaterGait, start a paper trail of your falls or near-misses. Documentation is the only language insurance adjusters speak in May 2026.
The Another DAMM Find mission is about real talk for real people. We aren't here to give you a polished, corporate version of limb loss. We’re here to give you the intel you need to stay mobile and the style you need to feel like yourself. Stay bold. Stay dry. Keep moving. Life is too damn short to spend it worrying about a little water. Take the strategies from this guide, protect your gear, and get back to the hunt for what makes you feel alive. You’ve got the intel. Now go use it.
Stop Gambling With Your Hardware
You now have the tactical blueprint for keeping your limb functional and your skin intact. Whether you’re dropping $74.99 on a vacuum sleeve or using the double-bag contractor method, you know how to waterproof a prosthetic leg for the shower without trashing your investment. Don't let the fear of a rusted pylon or a nasty fall keep you from a basic human routine. You’ve got the intel on non-slip mats and the post-shower drying protocol. It’s about more than just staying dry; it’s about maintaining your independence and your damn dignity.
We’re veteran-owned and operated. We don't do sterile medical talk. We do real-world survival and raw art. Life as an amputee is a constant hunt for better solutions and better vibes. Reclaim your confidence and wear your story with pride. Our gear features original lettering prints by Rich Damm for people who live outside the mainstream. Check out our bold Amputee Awareness gear at Another DAMM Find and join a community that actually gets it. Stay bold. Stay dry. Keep moving forward.
Frequently Asked Questions
Can I use a regular trash bag to waterproof my leg?
You can, but don't use those flimsy 13-gallon kitchen bags that tear if you look at them wrong. You need 3-mil contractor bags for a real chance at staying dry. Double-bag the limb and secure it with duct tape above the socket. It is a solid budget hack for how to waterproof a prosthetic leg for the shower when you are in a tactical pinch. Just remember that plastic on wet tile is a damn death trap without a non-slip mat.
Will insurance pay for a dedicated waterproof shower leg?
Insurance usually covers the $74 vacuum sleeves but rejects the $2,050 dedicated shower legs. Medicare Part B typically pays 80% for standard covers under L-Codes L5704 through L5707. However, they often label a second "bathroom leg" as not medically necessary. As of May 2026, you will need a mountain of paperwork and a strong argument about fall prevention to get them to cough up the cash for a WaterGait.
How do I know if my prosthetic is already water-resistant?
Check your component manual for an IP rating or specific "submersible" branding. If you are rocking an Ottobock Genium X3, you have high-tech waterproofing built in. Most standard legs use carbon steel and aluminum that start to oxidize the second they hit high humidity. If the manufacturer doesn't explicitly brag about it being waterproof, assume it is a land-only machine. Drying off a non-waterproof leg after the fact is rarely enough to save the internal springs.
What should I do if my prosthetic leg accidentally gets wet?
Dry it immediately and get that socket off your skin. Use a hairdryer on a cool setting to blow air into the joints and pylon. Never use the heat setting because you will warp the carbon fiber and ruin the structural integrity. If you have a microprocessor limb, call your prosthetist before the circuits fry. It is a high-stakes race against corrosion, and every minute the moisture sits in those pivot points counts against you.
Are there specific shower covers for above-knee amputees?
Yes, manufacturers make full-length vacuum sleeves designed to go all the way to the groin. These are essential for protecting the complex knee unit from splash damage. They are a bit more of a damn struggle to put on compared to below-knee versions. You have to get the thigh circumference measurement perfect. If the seal is loose at the top, the vacuum fails and your expensive knee becomes a very heavy sponge.
How long do professional waterproof covers typically last?
Most professional covers like the DryPro last between six months and a year with daily use. Their lifespan depends on how well you treat the rubber and if your leg has sharp bolts poking out. Inspect the sleeve for pinholes every single week. A tiny leak can destroy a $20,000 component before you even finish your morning routine. Replace it the second you see the rubber starting to thin or lose its stretch.
Can I use a waterproof cover for swimming in a pool?
Vacuum-seal covers are rated for swimming and full submersion in both pools and the ocean. They are built to handle the pressure of being underwater without breaking the seal. Just remember that sand and chlorine are the enemies of your moving parts. Always rinse the cover and the hardware with fresh water after your swim to stop salt and chemical damage from eating the finish. It is a vibe to hit the beach, just do it smart.
Is it better to just use a shower chair and leave the leg off?
A shower chair is technically safer, but it is a compromise on your independence. Many amputees prefer to stand because it makes the routine feel less like a medical procedure. If you have the right gear and a non-slip environment, standing is fine. If you are feeling tired or the floor looks like a skating rink, sit your ass down. Safety beats pride every single time in a wet bathroom. Reclaim your routine on your own terms.


