


Your wall looks like a college freshman's basement and it's killing the vibe of that one-of-a-kind print you spent weeks tracking down. Tacking a masterpiece to the drywall with tape is a crime. You know it. I know it. But the alternative often feels just as bad. Walking into a traditional frame shop usually means getting hit with a bill that costs more than the art itself. It's confusing. It's stuffy. It's enough to make you leave your art in the shipping tube until the end of time.
We're here to kill the gatekeeping. Finding the best way to frame a custom print shouldn't feel like a corporate board meeting. You want a setup that matches your energy and keeps that ink from fading into a ghost of its former self. We're breaking down how to frame like a collector who actually gives a damn. You'll learn how to navigate the cost of UV protection, why acid-free materials are non-negotiable, and when to trust a pro versus doing it yourself. It's time to stop treating your collection like a dorm room poster and start giving it the respect it deserves.
Key Takeaways
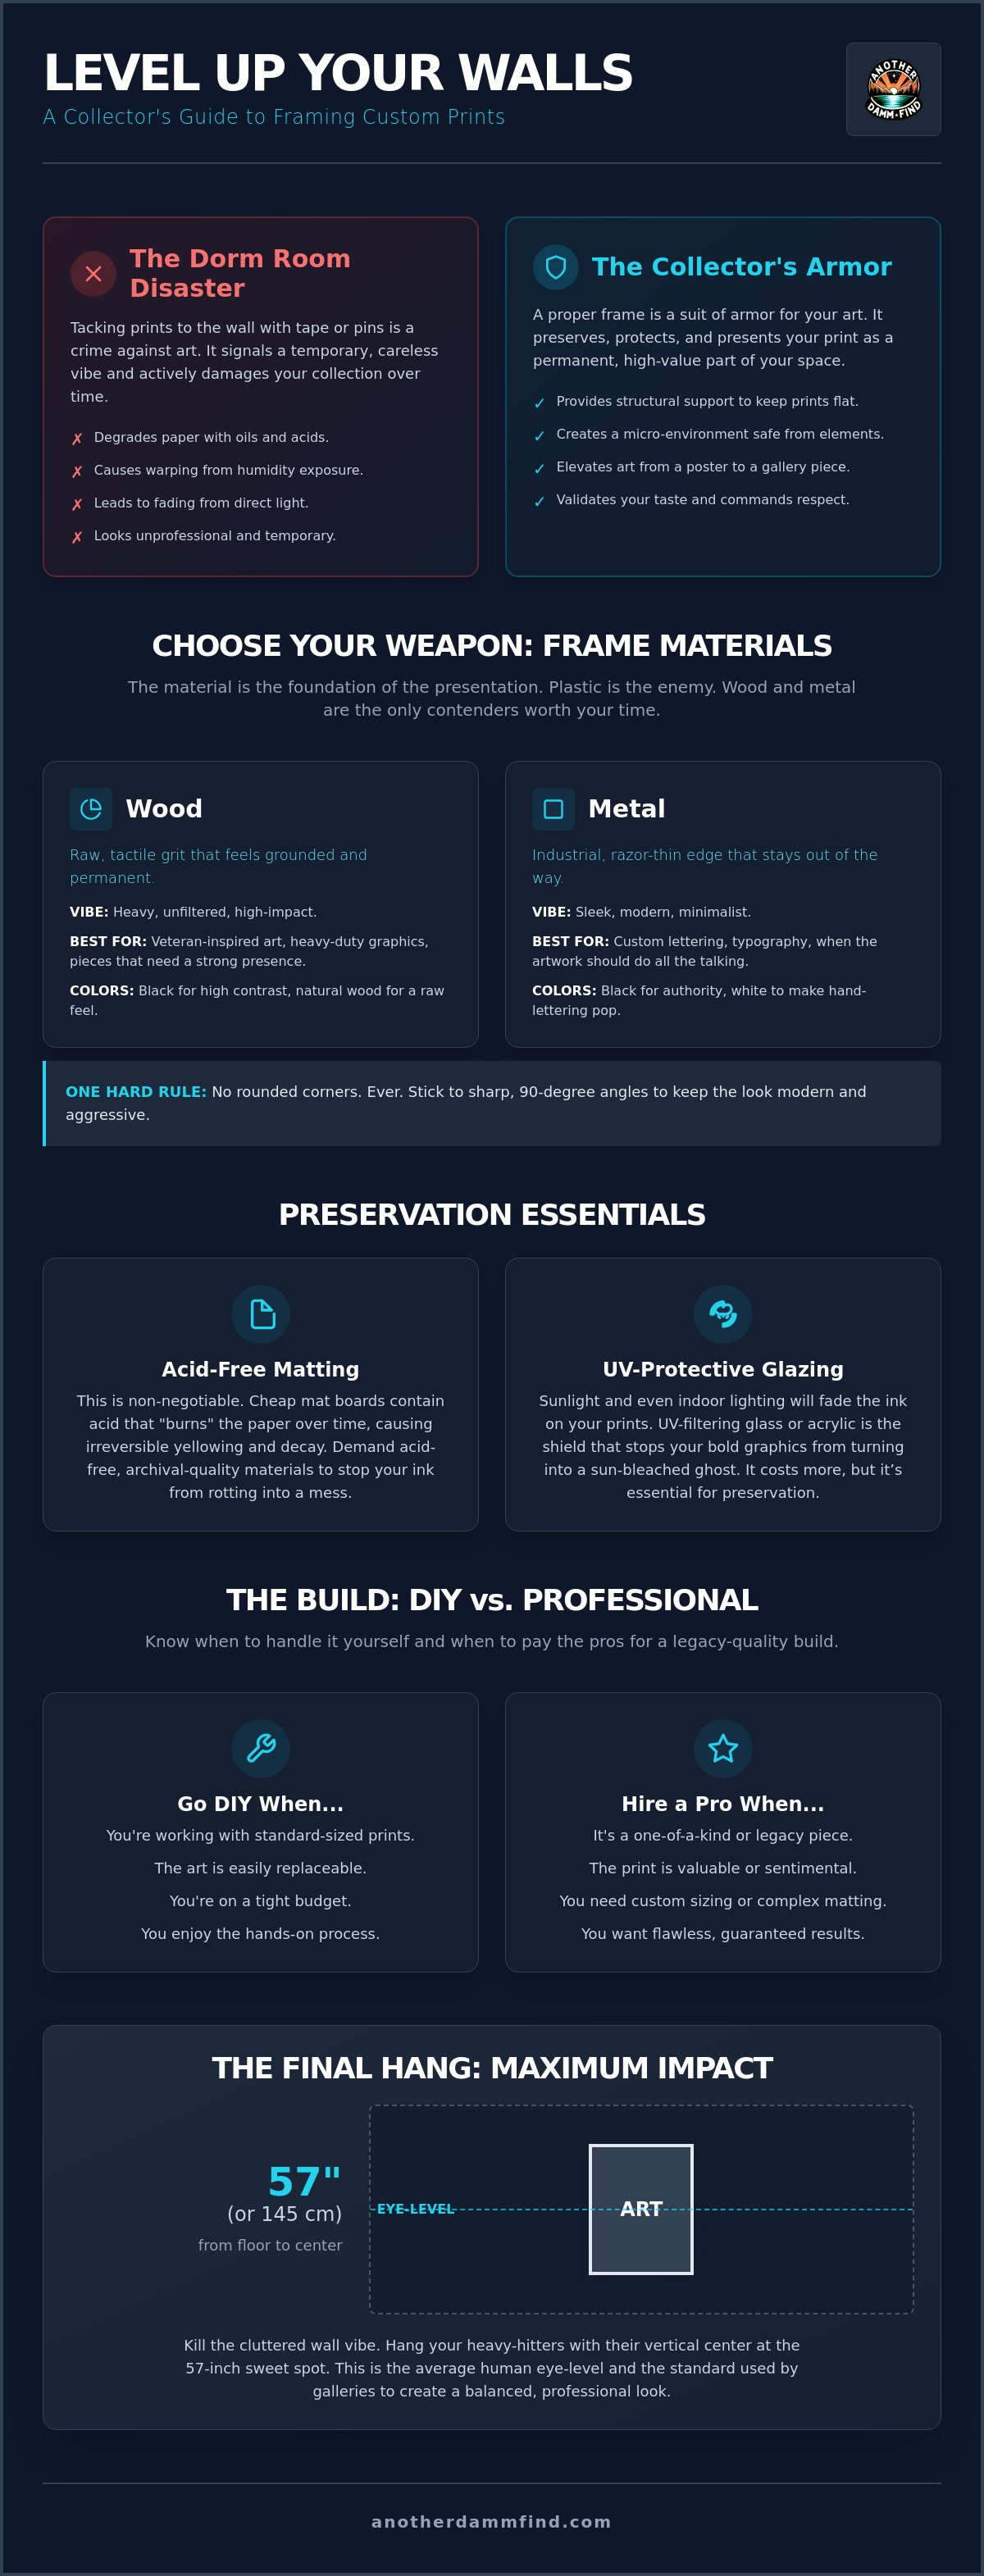
- Stop the tape-on-drywall disaster and treat your art like the high-end armor it actually is.
- Pick your weapon between raw, tactile wood or cold, industrial metal to lock in your specific aesthetic.
- Demand acid-free matting to stop cheap, corporate materials from rotting your ink into a yellowed mess.
- Identify the best way to frame a custom print by knowing when to go DIY and when to pay the pros for a legacy piece.
- Kill the cluttered wall vibe by hanging your heavy-hitters at the 57-inch sweet spot for maximum impact.
Stop Tacking Art to the Wall: The Best Way to Frame a Custom Print in 2026
Look. We've all been there. You get a fresh piece of art and you're so hyped to see it up that you grab the nearest roll of Scotch tape or a handful of thumbtacks. Stop. Just stop. Tacking art to the wall is a move reserved for teenagers and dorm rooms. It's disrespectful to the artist and, frankly, it makes your space look like a temporary squat. A proper frame commands respect. It tells anyone walking into the room that you actually give a damn about what's on your walls. It turns a casual purchase into a permanent statement.
Think of it as a suit of armor for your collection. Custom prints aren't just paper; they're an investment in your personality. The best way to frame a custom print starts with understanding that paper is alive. It breathes. It reacts to the world around it. Without a solid border, your art is at the mercy of the elements. Humidity is a silent killer, turning a crisp, flat print into a wavy, distorted mess within months. A high-quality Picture frame provides the structural integrity needed to keep that paper flat and the ink looking as sharp as the day it was pulled from the press.
The Transition from Dorm Room to Collector
Your Rich Damm Original Lettering Prints deserve better than a sticky strip of blue painter's tape. When you shift from simply hanging stuff up to curating a space, the vibe of your entire room changes instantly. It's a psychological upgrade. Seeing your personality framed properly validates your taste. It turns a piece of paper into a focal point. You aren't just decorating; you're building a gallery that reflects who you are. The best way to frame a custom print is to choose materials that feel as raw and authentic as the art itself. It's the difference between a temporary poster and a legacy piece.
Protecting the Investment in Your Art
Light and air are the primary enemies of your collection. Custom ink reacts to oxygen and UV rays, slowly fading until your bold graphic looks like a sun-bleached receipt. Cheap, big-box store frames are often the culprit. They use acidic backing boards and low-grade plastic that actually accelerate the destruction of your art over time. There is a massive difference between simply hanging art and preserving it. Preservation means using materials that don't fight against the paper. It means creating a micro-environment where the art can live for decades without yellowing or cracking. Don't let a twenty-dollar frame ruin a one-of-a-kind find.
Choosing Your Weapon: Frame Materials That Don’t Look Like Corporate Crap
Picking a frame isn't just about matching your curtains. It's about choosing a weapon. You've got the art. Now you need the hardware that backs it up without looking like it was mass-produced in a sterile factory for a dental office. The best way to frame a custom print is to ignore the plastic "bargain" bins. Plastic is the enemy. It looks cheap. It feels cheap. It warps the second the temperature shifts. If you want your art to command a room, you need material with weight and soul.
Wood and metal are the only two contenders worth your time. Wood offers that heavy, tactile grit that feels grounded and permanent. Metal brings an industrial, razor-thin edge that stays out of the way. When making this call, check out these 10 expert tips on choosing the perfect frame to see how the pros balance aesthetics with structural integrity. Whether you're going for a rugged veteran vibe or a clean streetwear look, the material is the foundation of the entire presentation.
Wood vs. Metal: The Vibe Check
Chunky wood frames are built for impact. They have a raw, unfiltered energy that pairs perfectly with veteran-inspired art or heavy-duty graphics. It feels solid. It feels real. On the flip side, thin metal frames are the go-to for custom lettering. They provide a sleek border that lets the typography do the heavy lifting. One hard rule: no rounded corners. Ever. Rounded corners are for 1990s office signage. Stick to sharp, 90-degree angles to keep the look modern and aggressive. If you're looking for art that actually deserves this level of hardware, browse the Rich Damm Original Lettering Prints for pieces that hit hard.
The Color Palette of Your Frame
Color is where the attitude settles in. Black frames are the universal heavy-hitter. They provide high contrast and a sense of authority that works with almost anything. They don't apologize. They just exist, loudly. White frames are the secret weapon for hand lettering. They let the negative space breathe, making the ink look like it's floating on the wall rather than being trapped in a box. It's about giving the art room to exist without the frame suffocating the message.
- Black: High-impact, high-attitude, zero excuses.
- White: Minimalist and clean; lets complex lettering speak for itself.
- Raw Wood: Organic and fiercely independent; highlights the natural grain.
Raw wood finishes like walnut or oak are for the purists. They offer an unfiltered, independent personality that signals you value the history of the materials as much as the art itself. Match the frame to the energy of the print. If the art is loud, let the frame be the silent muscle that holds it up. The best way to frame a custom print is to ensure the frame and the art are speaking the same language. You want a curated chaos that feels both intentional and effortless.
The Matting Debate: Protecting the Ink Without the Sterile Gallery Vibe
Some people think a mat is just extra fluff to make a piece look bigger or more "expensive." They're wrong. While the aesthetic is a factor, the real reason to use a mat is functional. It’s a literal spacer. You never want your art touching the glass or acrylic glazing. If humidity gets trapped in there, the paper can stick to the glass, or worse, grow a colony of mold that eats your ink for breakfast. The best way to frame a custom print involves creating that tiny pocket of air so the paper can breathe without being smothered by its own housing.
A mat provides that essential gap, but it doesn't have to look like a dusty museum relic. You can play with textures, colors, and widths to keep the energy high. The goal is to separate the art from the environment while making sure the presentation doesn't feel like it belongs in a corporate lobby. It's about protecting the soul of the piece without killing its edge.
The "Must-Have" Acid-Free Rule
If you take nothing else away from this guide, remember this: acid-free is the only option. Standard cardboard or cheap mat board contains lignin. Over time, that lignin breaks down and releases acid. This is what causes those nasty yellow "burn" marks around the edges of old prints. It's chemical warfare on your collection. When you're dealing with high-end pieces like those discussed in The Raw Art of Hand Lettering, the ink and paper need a neutral environment to survive. Don't let a five-dollar piece of junk cardboard rot your investment from the outside in. Demand alpha-cellulose or cotton rag mats. They are chemically stable and won't turn your art into a yellowed relic of a bad decision.
Floating vs. Traditional Matting
Traditional matting is the clean, structured choice. It covers the edges of the paper and creates a window. It's professional. It's sharp. But if your print has deckled hand-torn edges or a unique paper texture, traditional matting hides the best parts. That's where floating comes in. Floating involves mounting the art on top of the mat board using archival hinges. This lets the entire piece of paper sit in the spotlight, showing off the raw edges and the tactile quality of the stock. It’s a bold, high-attitude move that screams "one-of-a-kind."
Whether you go traditional or float, don't get stingy with the width. A narrow mat looks cramped and cheap. It makes the art feel like it's being squeezed. Aim for at least two to three inches of matting on all sides. This gives the print room to exist. It forces the viewer’s eye toward the center. If you want a little extra grit, try double matting. Adding a second, thinner mat in a contrasting color can provide a punch of attitude that ties the whole frame into the room's energy. Finding the best way to frame a custom print means balancing this protection with a look that doesn't feel like it belongs in a sterile, corporate hallway.
DIY Framing vs. Professional Shops: When to Spend the Damn Money
Determining the best way to frame a custom print depends on your patience and the size of your ego. DIY isn't just about saving money; it's about the hustle. If you've got a standard-sized print and a steady hand, you can pull off a high-end look on a budget. But let's be real. Some pieces are "forever" art. If you're holding a one-of-a-kind original or a massive oversized print, trying to save a few bucks at a big-box craft store is a recipe for disaster.
There is a middle path that most people ignore. You can buy a high-grade, custom-sized frame online and handle the final assembly yourself. This bridges the gap between cheap plastic junk and bank-breaking gallery prices. Regardless of the path you choose, the one upgrade you must never skip is UV-protective glass or acrylic. Verified data shows these upgrades block up to 99% of harmful rays. It typically adds between $30 and $60 to the cost, but it's the only thing standing between your art and a slow, sun-bleached death. If you're ready to put these tips to the test, grab one of our Rich Damm Original Lettering Prints and start building your wall of fame.
The DIY Hustle: Getting the Look for Less
If you're going the DIY route, don't be a hero with the mat cutter. It's harder than it looks. One slip and you've ruined your mat and potentially your day. Buy pre-cut mats whenever possible. The most annoying but critical step is cleaning the glass. Use a microfiber cloth and dedicated glass cleaner. One stray hair or fingerprint inside the frame will haunt you every time you walk past it. Secure the back with professional points and archival tape to keep everything tight and dust-free.
The Pro Advantage: When You Can’t Afford to Mess Up
Professional framing is the move for oversized prints. Trying to DIY a 24x36 frame usually results in a sagging, flimsy mess. Pros use heavy-duty hardware and archival mounting techniques that keep the print perfectly flat without using permanent glues that destroy the value of the art. They also have an eye for color and texture that helps you pick a frame that makes the art pop rather than just blending into the drywall. It's an investment in the longevity of your collection.
- DIY: Best for standard 8x10 or 11x14 prints and "frugal" wins.
- Middle Path: Custom frames ordered online for self-assembly.
- Professional: Essential for odd sizes, large-scale art, and legacy pieces.
- UV Protection: The non-negotiable upgrade for any print you actually like.
The Final Hang: How to Display Your Find Without Looking Like a Teenager
You’ve done the hard work. You’ve sourced the art, picked the material, and decided between a DIY hustle or a pro finish. But if you hang that masterpiece at the wrong height, you might as well have left it in the shipping tube. The best way to frame a custom print ends with a display that actually commands the room. Most people hang their art way too high, making it look like it’s trying to escape through the ceiling. Stop doing that. It’s a rookie move that kills the vibe of even the most aggressive prints.
Aim for 57 inches on center. This is the gold standard used in galleries for a reason. It places the heart of the art at natural eye level for most people. If you’re hanging it over a couch or a sideboard, keep it about 6 to 8 inches above the furniture. This creates a cohesive unit rather than two separate objects floating in space. It’s about building an atmosphere that feels intentional. Our approach to display is as raw and unfiltered as The Another DAMM Find Story, where authenticity beats sterile perfection every time.
Height and Placement Strategy
The 57-inch rule works because it creates a consistent horizon line throughout your space. It doesn't matter if the ceiling is ten feet high or eight. When the centers of your frames align, the room feels grounded. If you are centering art over a desk or a bed, make sure the frame width is roughly two-thirds the width of the furniture. Anything smaller looks like an afterthought. Anything larger feels top-heavy and unstable. Balance is everything.
Creating a "Curated Chaos" Gallery Wall
Sometimes, the power of one is all you need. A single, massive statement piece can carry an entire wall better than a dozen tiny, cluttered frames. It creates a focal point that demands attention. If you do go the gallery route, embrace curated chaos. Mix your wood and metal frames. Keep the spacing tight, around 2 to 3 inches between pieces, to make the collection feel like a single, rebellious unit. It shouldn't look like a corporate lobby. It should look like a reflection of your evolving taste. The best way to frame a custom print is to let it live in a space that grows with you.
- The 57-inch Rule: Hang the center of the art at eye level.
- Furniture Flow: Keep art 6 to 8 inches above surfaces.
- Power of One: Don't be afraid of a single, bold statement piece.
- Curated Chaos: Mix frame materials for an independent, non-corporate look.
Lighting is the final boss. Don’t let your art hide in the shadows of a dim corner. Shadows wash out the details of hand-lettered ink and make the colors look muddy. Use a dedicated picture light or adjust your room’s track lighting to hit the print directly. As for the hardware, the renter’s dilemma is real. Command strips are fine for light frames, but for the heavy-hitting wood frames we talked about earlier, use a proper nail and a stud. Don’t risk a one-of-a-kind print falling because you were afraid of a tiny hole in the drywall. Secure it right the first time.
Stop Decorating and Start Curating
Your walls are a direct reflection of your energy. Don't let them go soft. You know the hardware rules now. Ditch the cheap plastic. Stick to the 57-inch rule for height. Never settle for matting that isn't acid-free. Finding the best way to frame a custom print means balancing a raw, industrial aesthetic with the technical protection your art needs to survive the next decade. Whether you're going DIY or hiring a pro, the goal is the same. You want a space that feels intentional, unfiltered, and entirely your own.
Now that you've got the hardware figured out, you need art that actually hits hard. We are veteran-owned and operated, delivering original art by Rich Damm that refuses to blend into the background. These aren't just generic graphics. They are bold, conversation-starting designs built for people who hate corporate crap. To keep that custom energy flowing, 2d6 Designs is a creative studio that specializes in 3D-printed solutions for home improvement and unique gifts that fit this independent vibe. Stop settling for dorm room vibes and start building a legacy on your walls.
Check out our original lettering prints and start your collection
Go build something that makes people stop and look. Your art deserves the armor.
Frequently Asked Questions
Is it better to frame a print with glass or acrylic?
Acrylic is the superior choice for most collectors because it’s lighter and won’t shatter if it takes a hit. While glass is cheaper and resists scratches, it’s heavy as hell and dangerous if it breaks. High-end acrylic with UV filtering is the industry standard. It protects your investment without the weight of a brick. Choosing this material is the best way to frame a custom print for long-term durability.
How much should I expect to pay for professional custom framing?
Expect to spend between $100 and $400 for a standard professional framing job. Small frames usually start around $50, while large, complex projects can easily climb past $600. You aren't just paying for the wood and glass. You're paying for the specialized labor and the archival materials that keep your art from rotting over time. It’s an investment in the longevity of your collection that pays off for decades.
How do I measure my print for a frame and mat?
Start by measuring the exact dimensions of the paper, not just the image area. If you want a mat, add your desired mat width to all four sides to determine the final frame size. Use a metal ruler for precision because tape measures can flex and ruin your numbers. Eyeballing it is a guaranteed way to end up with a frame that doesn't fit, leaving your art looking cramped and unprofessional.
What is UV-protective glass and do I really need it?
UV-protective glazing is a specialized coating that blocks up to 99% of harmful rays. You absolutely need it if you want the best way to frame a custom print that stays vibrant for decades. Without it, the sun will bleach your ink into a ghost of its former self within a few years. It is a mandatory upgrade for real art, costing roughly $30 to $60 depending on the size of the piece.
Can I frame a print without a mat?
You can frame a print without a mat, but you must use spacers to prevent the art from touching the glass. This "full bleed" look is popular in modern galleries, but it’s risky without that air gap. If the paper touches the glazing, humidity can cause it to stick or grow mold, which is a death sentence for your print. Spacers provide that invisible protection while keeping the aesthetic clean and raw.
How do I stop my print from sticking to the glass?
Create a physical gap between the print and the glass using a mat or plastic spacers. Sticking happens when moisture gets trapped between the two surfaces, essentially gluing the ink to the glass. If your art is already stuck, don't try to peel it off yourself like a savage. Take it to a professional conservator before you rip the paper and destroy the piece. They have the tools to save your art without the carnage.
What is the best way to clean a frame without damaging the art?
Spray your cleaner onto a microfiber cloth rather than directly onto the frame. If liquid drips behind the glass, it will ruin the paper and the ink instantly. Use a dedicated glass or acrylic cleaner to avoid scratches and streaks. Keep the moisture on the cloth and away from the edges of the frame to keep the art safe. This simple habit prevents the accidental destruction of your most prized custom pieces.
Should I use a dry mount for my custom prints?
Never use dry mounting for valuable or one-of-a-kind prints because the process is permanent and uses heat and glue. It’s great for cheap posters that you want to keep flat, but it kills the resale value of real art. Use archival hinges instead. This keeps the print secure while allowing it to be removed or reframed in the future. It preserves the integrity of the paper without the toxic commitment of permanent adhesives.


